
Gh Python Script in Grasshopper for Beginners

Why learn Python in Grasshopper?
Grasshopper is a powerful visual programming environment that allows designers to create complex parametric workflows without writing code. However, as your definitions become more advanced, you might encounter situations where finding the right component becomes difficult, processing data requires complicated setups, or you need more control over your workflow.
This is where Python becomes useful. The good news? You don't need to be a programmer to start using Python in Grasshopper. In fact, your first script can be written in just two lines:
import rhinoscriptsyntax as rs
a = rs.AddCircle(x,y)
In this tutorial, we'll explore the basic structure of a Python script, create our first circle, and discover how Python can help us perform operations that aren't directly available through native Grasshopper components.
Understanding the structure of a Python script
Most beginner Grasshopper Python scripts can be understood in three simple steps.
1. Import libraries → 2. Write the script → 3. Output results
Step 1 : Import libraries
A library is a collection of ready-made commands that we can use in our scripts.
Instead of writing everything from scratch, we can access existing functionality from Rhino and Python.
For example:
import rhinoscriptsyntax as rs
import Rhino.Geometry as rg
import math
...
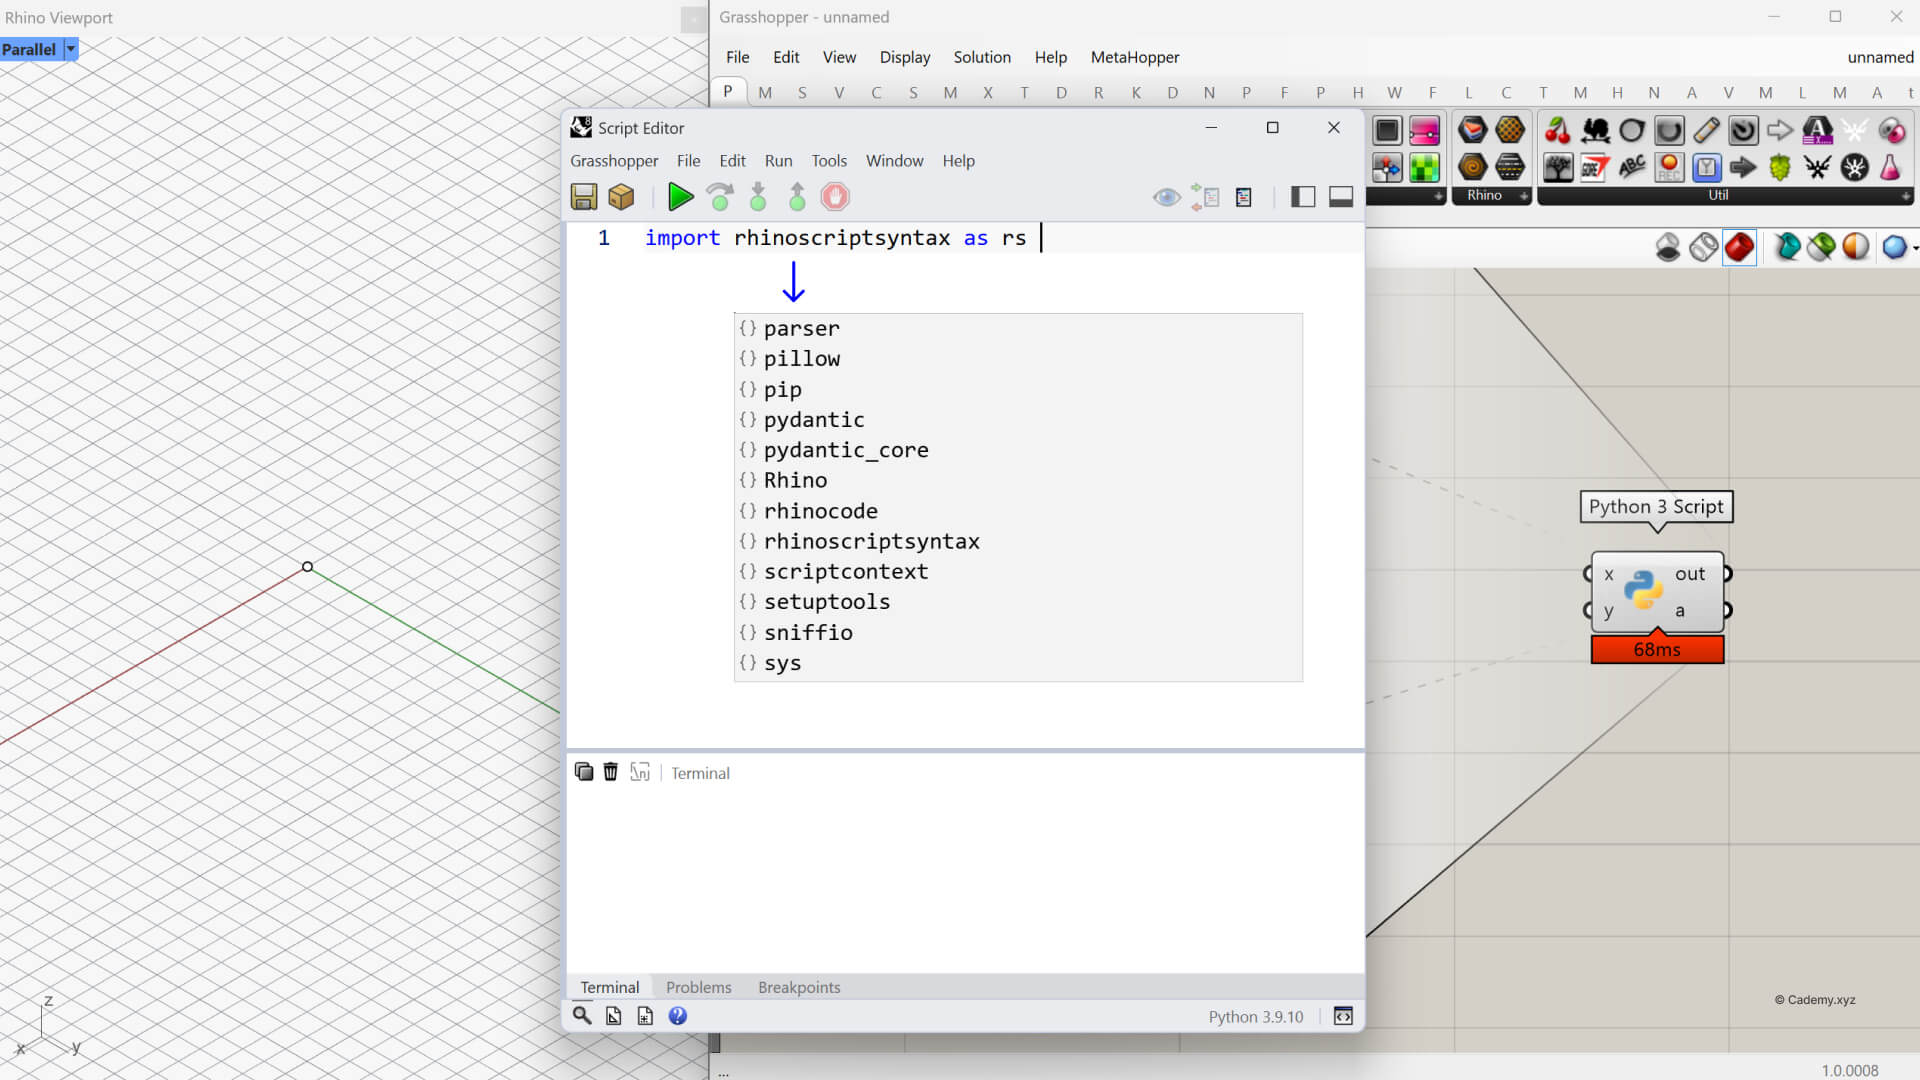
Here, we're importing three different libraries:
rhinoscriptsyntaxprovides convenient commands for creating and modifying Rhino objects.Rhino.Geometryprovides direct access to Rhino's geometry classes and methods.mathprovides mathematical operations such as trigonometry and square roots.
Notice the use of as rs and as rg. These are simply shortcuts that make the commands easier to write. For example, instead of typing rhinoscriptsyntax.AddCircle(), we can write rs.AddCircle().
Step 2 : The core of your script
This is where we tell Python what to do. We can define variables, execute commands, perform calculations, or repeat operations using loops. For example:
....
a = rs.AddCircle(x,y)
....
The AddCircle() function creates a circle using two parameters. The brackets () contain the information that the command needs to execute.
x— The plane on which the circle will be created.y— The radius of the circle.
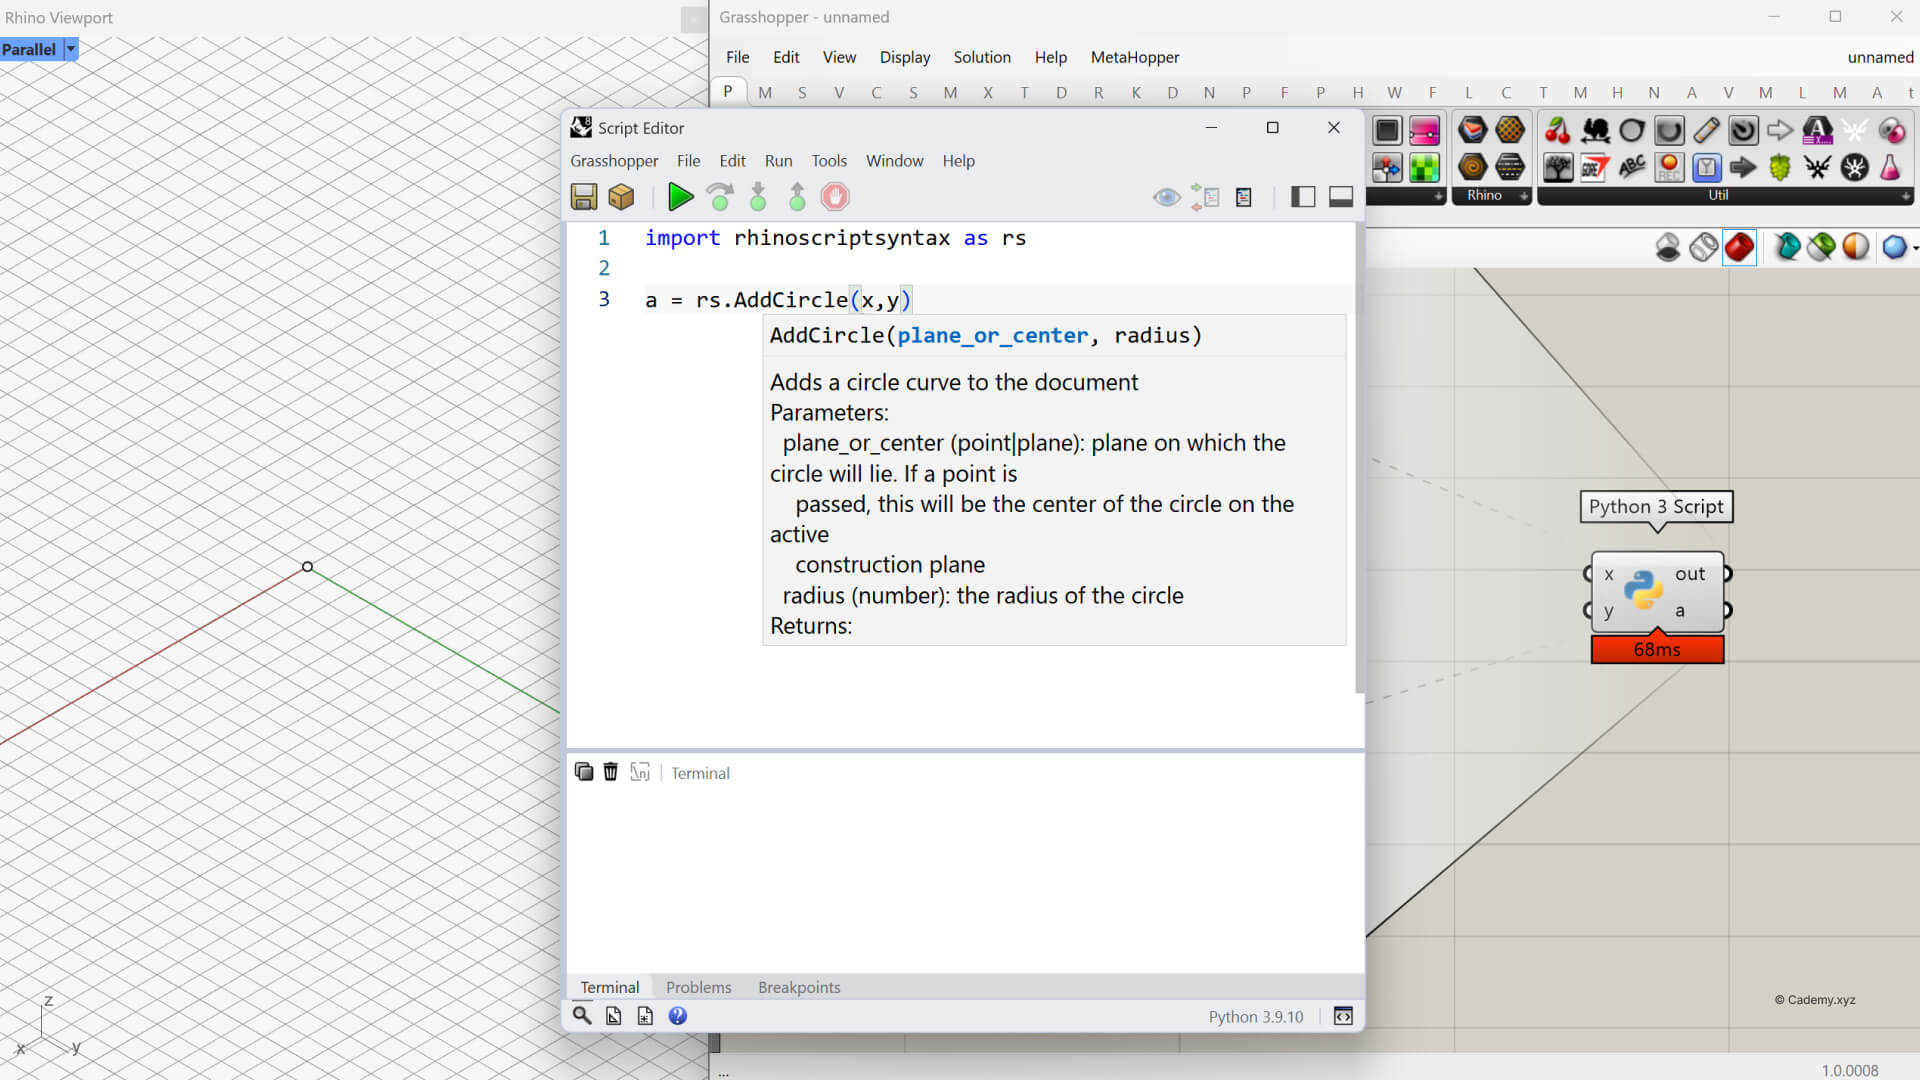
The brackets () contain the information that the command needs to execute. For this example, configure x as a Plane input and y as a Radius input. Connect a Point parameter and Number Slider to the Python component.
Step 3 : Exporting results
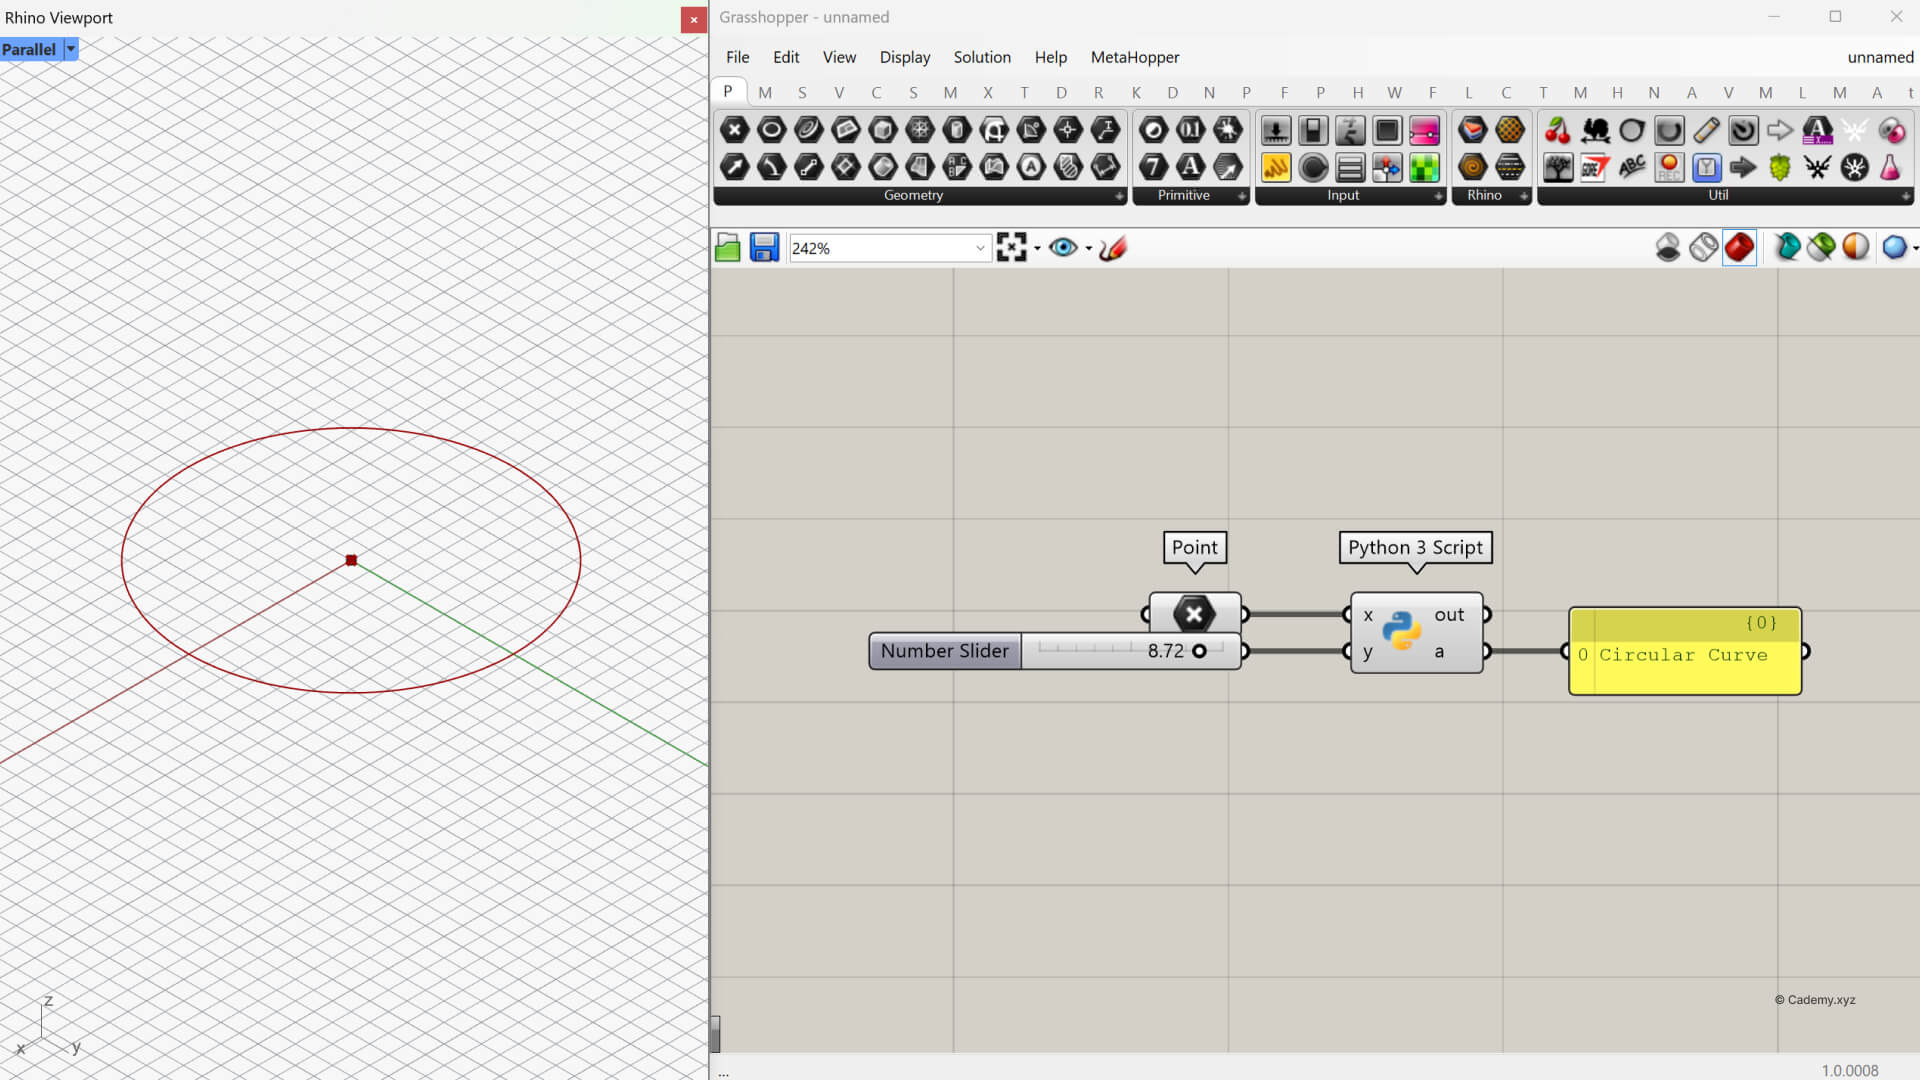
In Grasshopper, Python components have inputs and outputs, just like regular components. By default, one of the outputs is named a. When we write:
a = rg.Circle(x,y)
We're assigning the resulting circle to that output. Any Grasshopper component connected to output a can then use the circle as geometry.
Another practical example: Offset a surface and create a solid
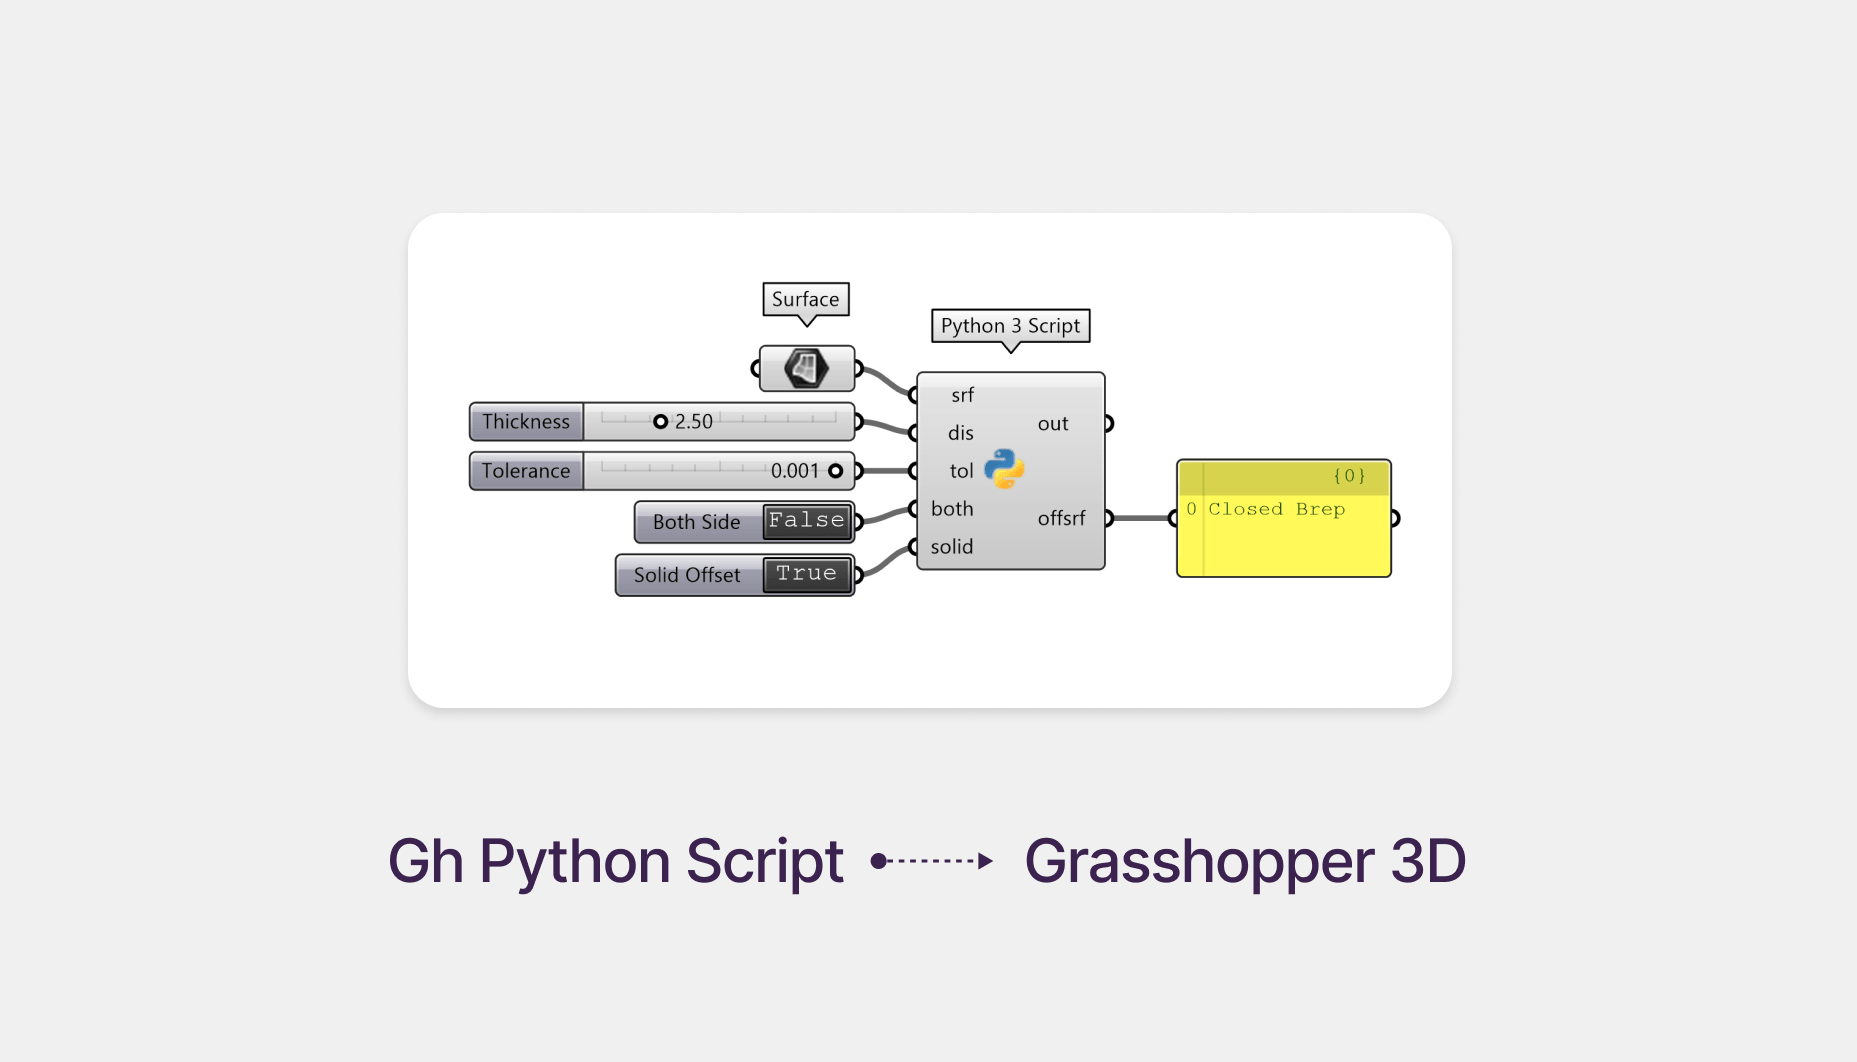
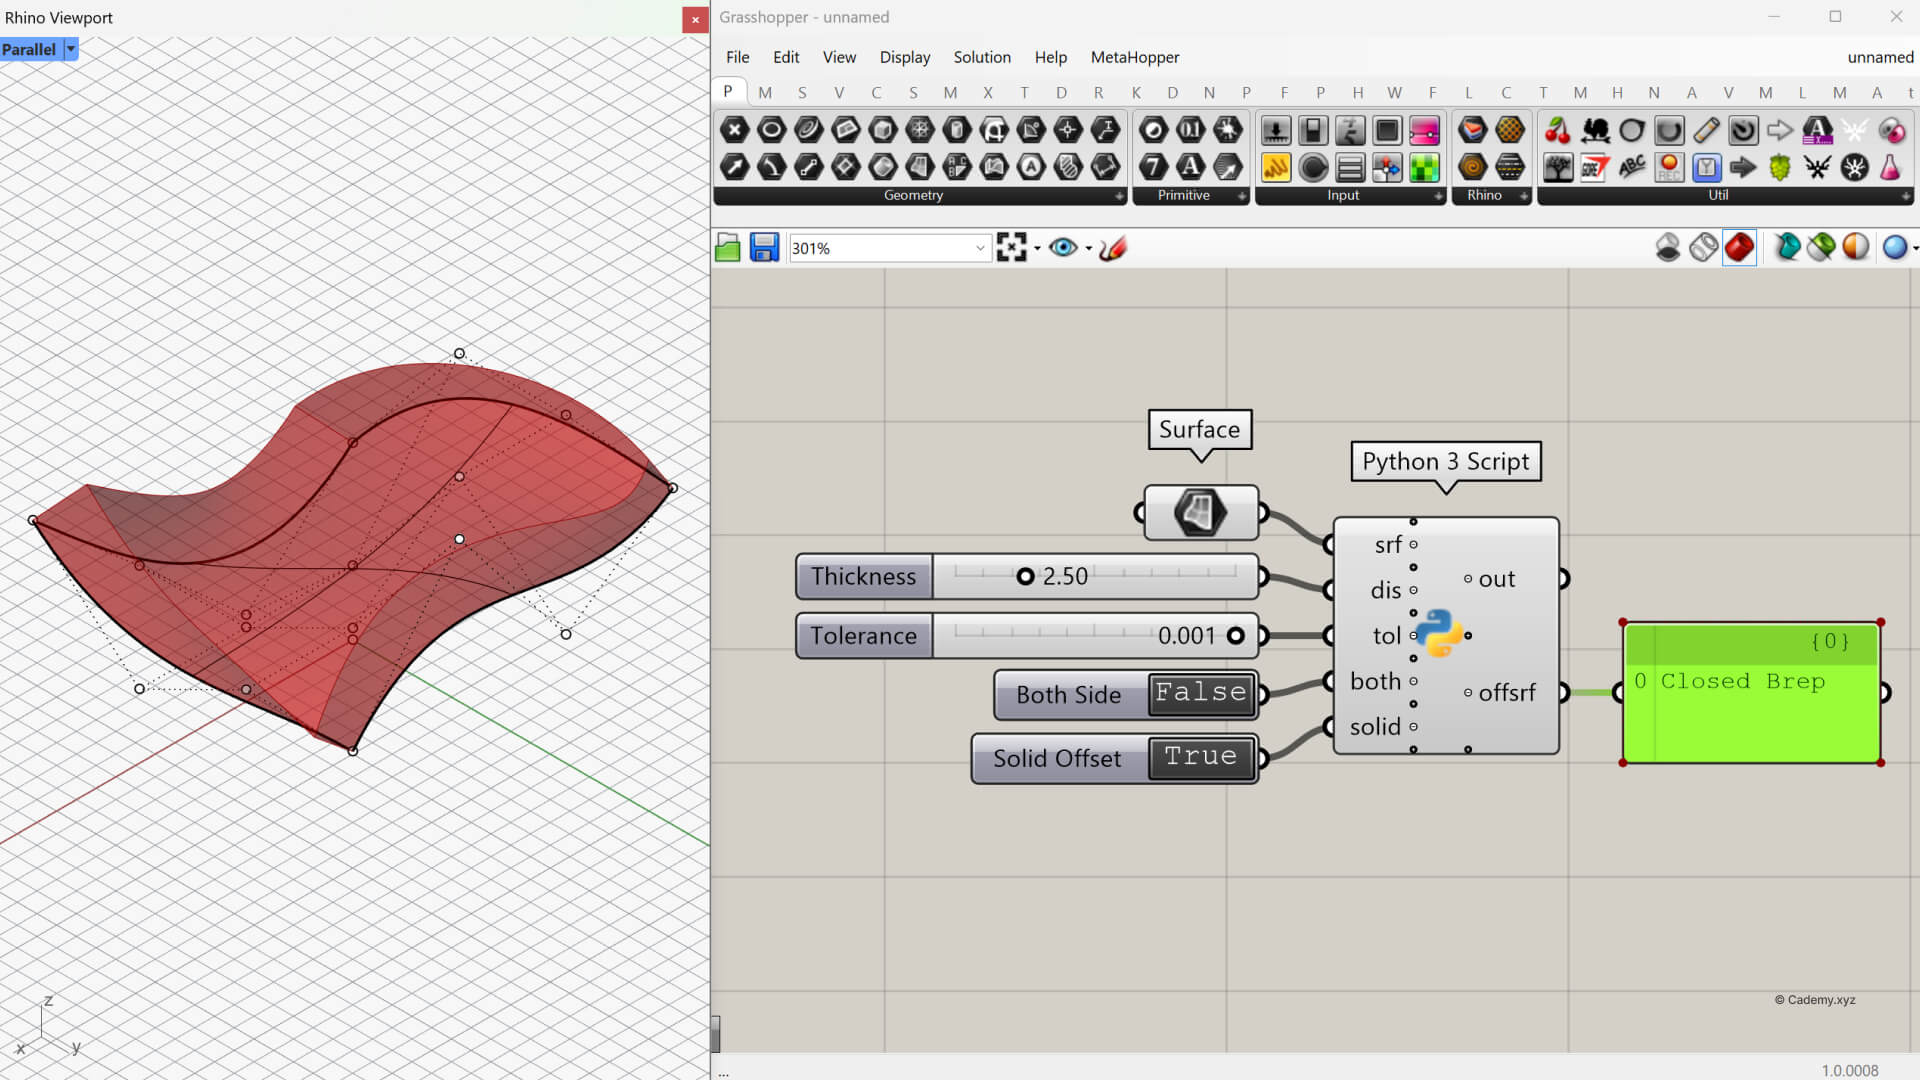
Now that we understand the basic structure, let's look at a more practical example. Rhino provides the OffsetSrf command, but Grasshopper's native components don't offer the same straightforward solid-offset workflow. You may need to combine multiple components or install an additional plugin.
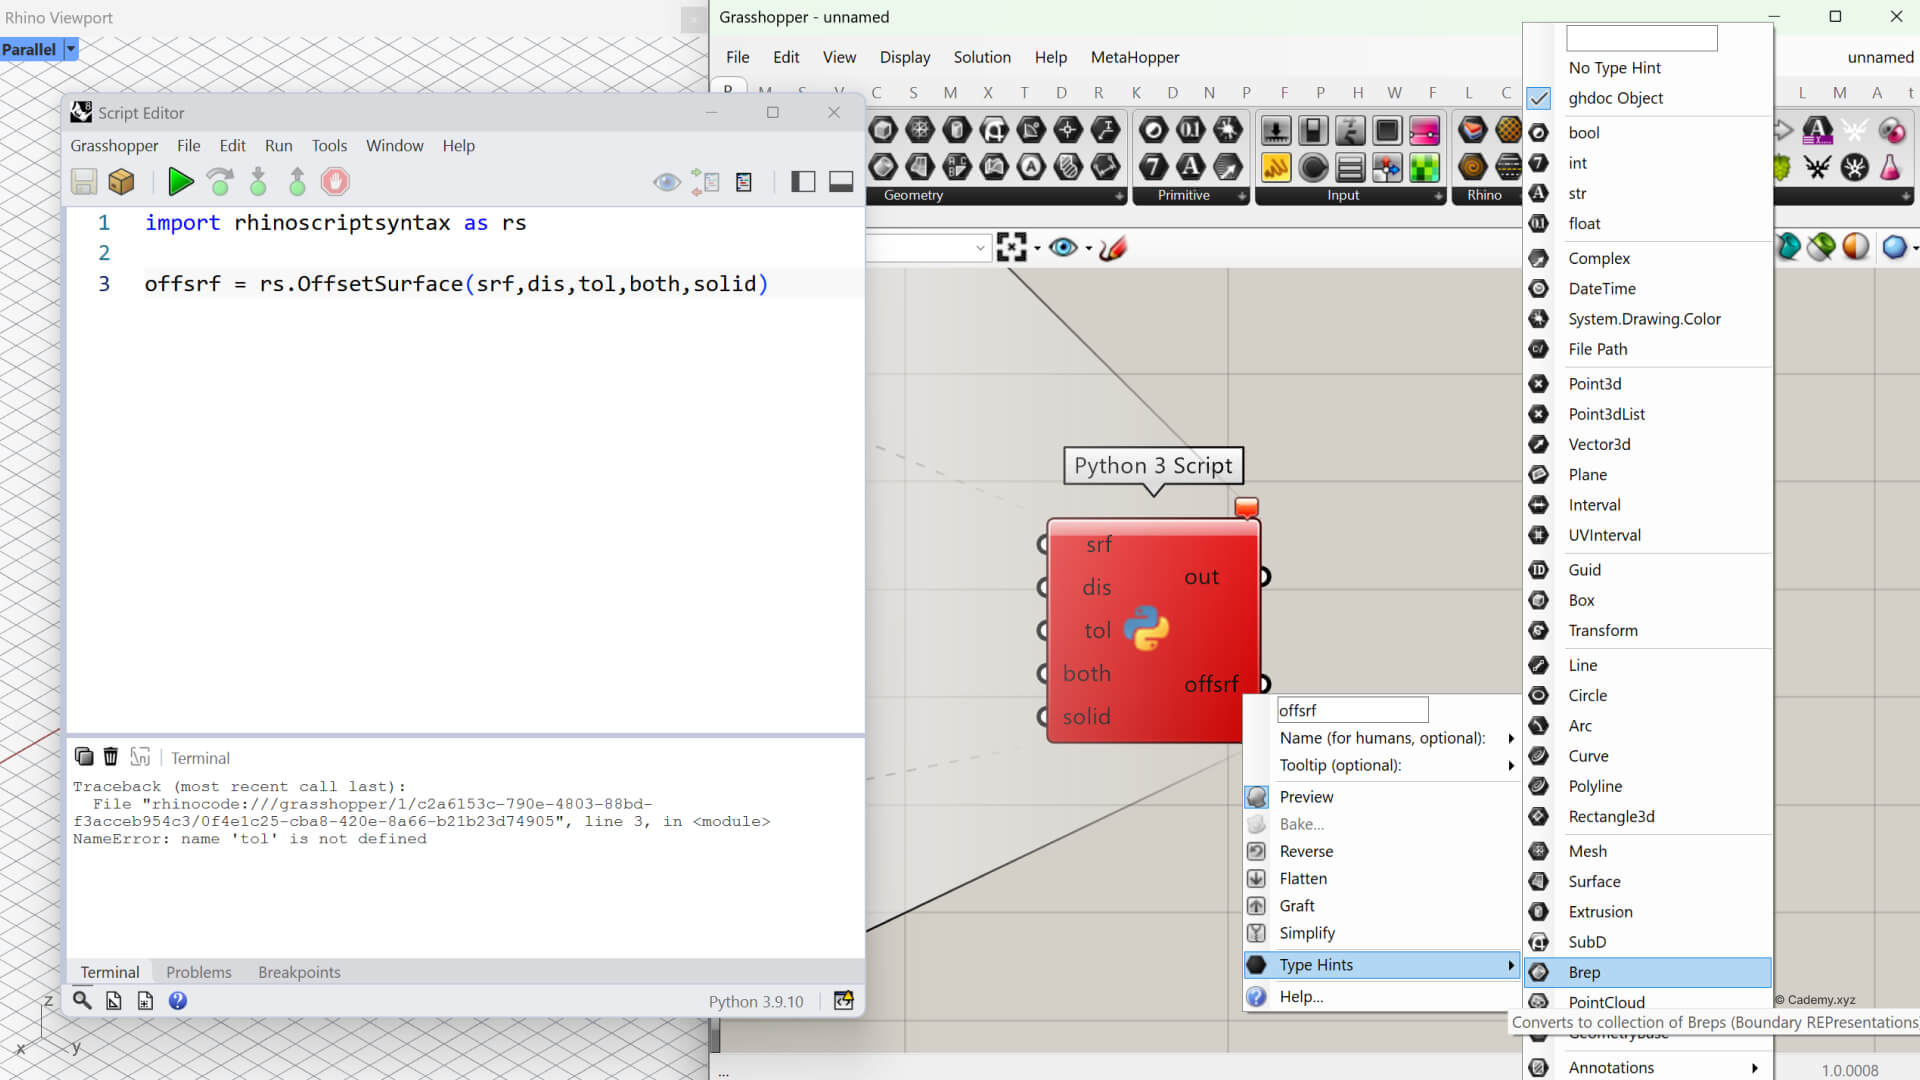
With GhPython Script, we can access the RhinoScriptSyntax OffsetSurface function directly. It has four parametrs:
- surface_id : Brep type hint
- distance : Float type hint
- tolerance : Float type hint or set it to 0.001
- both_sides : Boolean type hint
- create_solid : Boolean type hint
import rhinoscriptsyntax as rs
a = rs.OffsetSurface(x, y, create_solid=True)
IMPORTANT:
- Zoom in on the Python component to reveal the + / − buttons, which allow you to add or remove input and output parameters.
- Rename the parameters to match the variable names used in your script. Make sure the names are exactly the same, as Python is case-sensitive (for example,
Radiusandradiusare different variables). - Set the Type Hint by right-clicking each input parameter and selecting the appropriate data type, such as Number, Point, Curve, or Surface. This tells Python what kind of data to expect.
- Ignore any red error messages that may appear while configuring the component. These are normal when inputs are missing or the script is incomplete. They should disappear once everything is correctly connected and configured. If not, use the terminal to troubleshoot the error.
Three reasons Grasshopper users should learn Python
This is where I'd shift from the tutorial into the larger benefits of learning Python.
Reason 1 : Access functionality beyond native Grasshopper components
Not every Rhino command or modeling operation has a corresponding Grasshopper component. Python allows us to access a much larger collection of Rhino functionality, helping us build custom operations without always relying on third-party plugins.
Reason 2 : Process and organize data more efficiently
Grasshopper is excellent at working with lists and data trees, but certain tasks can become complicated when handled entirely with visual components. Python is particularly useful for:
- Filtering and sorting large datasets.
- Parsing text and extracting specific information.
- Reading and writing CSV or JSON files.
- Performing custom calculations.
- Combining multiple operations into reusable functions.
For certain workflows, a few lines of Python can replace a much larger network of components.
Reason 3 : Gain greater control over your Grasshopper environment
Python isn't limited to generating geometry. Using Grasshopper's API, we can interact with the Grasshopper document itself. For example, we can programmatically create components, change parameter values, organize objects on the canvas, modify connections, and automate repetitive setup tasks.
These are more advanced applications, but they demonstrate how Python can extend Grasshopper beyond its standard visual interface.
You can now make Gh Python Scripts with AI
This deserves its own section because it can make Python feel much more accessible to beginners.
Previously, learning scripting meant spending significant time understanding programming syntax, finding documentation, and debugging errors. Today, AI assistants can help you generate a starting script, explain unfamiliar functions, and troubleshoot issues. For example, you could ask:
EXAMPLE AI PROMPT
"Write a Python 3 script for Rhino 8 Grasshopper that takes a surface and a thickness value as inputs and generates a closed offset solid, and explain how to configure the inputs and outputs."
You can then paste the generated code into Grasshopper, test the results, and ask AI to help explain any errors.
However, understanding the basic structure of a script remains important. AI-generated code isn't always correct, and knowing what inputs, functions, and outputs do makes troubleshooting much easier. AI can help you write code, but understanding the logic helps you stay in control of your design.
Conclusion : Start small, then build your skills
Learning Python doesn't mean abandoning Grasshopper's visual programming approach. Think of Python as another tool in your computational design toolbox.
Start by importing a library, executing a simple command, and returning the result to Grasshopper. Once you're comfortable with that process, you can explore loops, custom functions, data processing, and more advanced automation.
You don't need to understand everything immediately. Start with a simple script and gradually expand what you can do.


